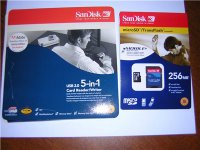
I learned to take a bunch of pictures and video but how do you get it onto your computer? They don't cover that in the instructions other than tell you to use a Trans T Flash, no product number, where to buy it etc. Leave that to you to figure out. I finally got a straight answer at Best Buy. One way was using a Trans T Flash card and a card reader. Another was a package with several adapter cables that would run from your phone to your USB on your computer. That was pretty expensive for just cables and no added memory and I'm not sure the adapter would fit my particular phone. I decided on the trans T Flash card and card reader. Add $70 to the cost of that phone and that was for the 256 trans T Flash card and a San Disk reader/writer.

The directions for this stuff were terrible. They must assume we first-timers would know this stuff already. But I finally figured it out. (I didn't need to install the card reader software because I use Windows XP) The trans flash comes in a package with two chips, a large one and a small one. I thought I was screwed as the large one wouldn't fit into my phone but fit the card reader and the small one fit my phone but was way too small for the card reader. But alas it came to me. The large one is an adapter to fit the card reader. You put the tiny chip inside the large chip and insert it into the card reader. I leave the large chip in the reader and just add and remove the trans flash card. In this picture I have inserted the adapter into the reader. The little chip goes inside the slot in the larger chip. Then press the button on the reader to transfer the images/music, etc. In Windows Explorer on your computer, you go to the E: drive and can move pictures/music on and off of the trans flash card.

To put the chip into your phone you insert the tiny wafer of a chip like in the picture. Gently push down until it snaps into place. To remove it you push it down further and it releases and pops up. You need a fingernail to do this as this is so small. In the picture below, the chip is inserted but not pushed all the way down to its seated position. It will snap into place.

The directions booklet included with the Verizon/Motorola phone fell apart after just a few page turns. I'm going to scan them into my computer and onto a disk and throw that cheap thing away. The directions from Verizon for transferring pictures didn't work and that was how the phone arrived, I didn't change anything. The menus and modes they use in the booklet aren't set up like my phone is. Can't anything nowadays be as simple as 123? Didn't someone actually try the directions before giving them out to the public? But I kept at it searching the menus until I found the right set up to do it.
But now I can hold about 300 pictures or lots of video and music. You can't use the music for ring tones unless you download from Verizon (what a scam that is) but you can transfer music from your cds to your computer then to your phone like an MP3 player. The music coming from the speakerphone isn't much quality but I haven't tried it with the earphones yet.
The pictures aren't bad. Better than I thought they would be. Below is a picture I took of my cat indoors, no flash. Any picture saved larger starts to get grainy. I'm extremely happy about my phone, just wish the instructions were better.


No comments:
Post a Comment